DIY Kitchen Decor Ideas
Transforming your kitchen doesn’t have to involve expensive renovations. With a little creativity and some DIY spirit, you can revamp your kitchen into a stylish and functional space. This article explores five fantastic DIY kitchen decor ideas that will breathe new life into your cooking and dining area. From revamping your backsplash to creating your own herb garden, these projects are designed to be both budget-friendly and aesthetically pleasing. Get ready to unleash your inner designer and create a kitchen you’ll love. The following projects are tailored to various skill levels, ensuring there’s something for everyone, regardless of your DIY experience. Get ready to transform your kitchen into a space that reflects your personal style and enhances your home’s overall appeal. Consider the layout of your kitchen and how these projects can complement it. Remember to plan your projects carefully and gather all the necessary materials before you begin.
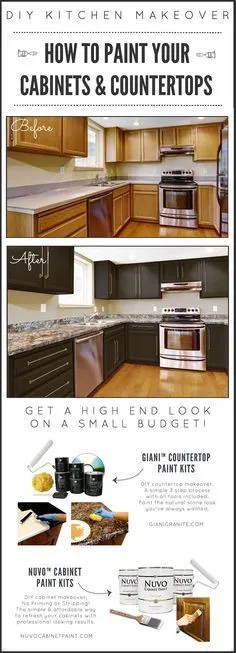
Revamping Kitchen with Painted Backsplash
A fresh coat of paint can dramatically change the look of your kitchen, and the backsplash is the perfect place to start. Painting your backsplash is a cost-effective way to introduce color and personality into your kitchen. It’s a relatively simple project that can be completed in a weekend, giving your kitchen an instant makeover. Before you begin, consider the existing tiles or surface and the overall aesthetic you’re aiming for. This project is fantastic because it allows for creativity and personalization, letting you experiment with colors and patterns to match your kitchen’s theme. Choose a paint that’s specifically designed for kitchens or high-moisture areas to ensure durability and longevity. Proper preparation is the key to a successful paint job and a long-lasting result. Clean the surface thoroughly to remove any grease, dirt, or grime, and repair any cracks or imperfections to create a smooth, even surface.
Choosing Right Paint Colors

Choosing the right paint color is crucial for setting the tone of your kitchen. Consider the size of your kitchen and the amount of natural light it receives. Lighter colors can make a small kitchen appear more spacious and bright, while darker colors can create a warm and inviting atmosphere in larger spaces. Neutral tones like white, gray, and beige are versatile and timeless choices that complement various decor styles. If you’re feeling adventurous, consider using accent colors to add a pop of personality. Before committing to a color, test swatches on your backsplash to see how they look in different lighting conditions. Pay attention to how the colors interact with your cabinets, countertops, and appliances. Color psychology plays a significant role; for instance, blues and greens can create a calming environment, while reds and yellows can stimulate appetite. Opt for kitchen-specific paint formulations that are designed to resist moisture and grease, ensuring the longevity of your new backsplash.
Preparing the Backsplash Surface
Proper surface preparation is essential for achieving a professional-looking paint job. Begin by thoroughly cleaning the backsplash to remove any dirt, grease, or mildew. Use a degreasing cleaner specifically designed for kitchen surfaces, and rinse the area thoroughly with water. Next, assess the condition of the backsplash. If there are any cracks, holes, or imperfections, fill them with spackle or a suitable filler. Once the filler is dry, sand the area smooth using fine-grit sandpaper. Apply painter’s tape around the edges of your backsplash to protect surrounding areas like cabinets and countertops. If your backsplash is tiled, lightly sand the tiles to improve paint adhesion. Applying a primer is crucial, particularly if you’re painting over existing tiles or a glossy surface. Primer helps the paint adhere better and creates a uniform base for your chosen color. Allow the primer to dry completely before applying the first coat of paint.
Painting Techniques and Tips
When painting your backsplash, use a high-quality paint roller and a small paintbrush for detailed areas, such as around outlets and edges. Apply thin, even coats of paint, allowing each coat to dry completely before applying the next. This prevents drips and ensures a smooth, consistent finish. For the best results, apply at least two coats of paint. Start by painting the edges and corners with a paintbrush, then use the roller to fill in the larger areas. Overlap each stroke slightly to ensure even coverage and avoid brush marks. If you’re painting a tiled backsplash, you might need to apply several coats of paint to fully cover the grout lines. Let the paint dry completely between coats. Remove the painter’s tape carefully after the final coat is dry to prevent peeling. Consider using a semi-gloss or gloss paint finish, as these are more durable and easier to clean in a kitchen environment. Always ventilate the kitchen well during the painting process to minimize fumes.
Stylish Open Shelving Units

Open shelving is a fantastic way to display your favorite kitchen items while adding a modern touch to your decor. It can create a more open and airy feel in your kitchen, making it appear larger and more inviting. Open shelving allows you to showcase your personality and style through carefully curated displays of dishware, cookbooks, and decorative items. Installing open shelves is often a straightforward DIY project that can significantly enhance the visual appeal of your kitchen. Consider the available wall space and how you want to use the shelves. Open shelving can be a great place to store frequently used items, making them easily accessible while adding to the aesthetic. Ensure that the shelves are securely mounted to the wall to prevent accidents and damage to your items. The visual impact of open shelving depends heavily on the way you arrange the items. Choose shelves that complement your kitchen’s overall design and enhance the available storage space.
Selecting Appropriate Shelving
Choosing the right shelving is essential for both aesthetics and functionality. Consider the material, size, and style of the shelves to ensure they complement your kitchen design. Wooden shelves offer a warm and rustic feel, while metal shelves provide a more modern and industrial look. The depth of the shelves should be appropriate for the items you plan to store. Deeper shelves can hold more items but may also make it harder to access items at the back. Measure the available wall space before purchasing shelves. Plan the height and spacing between shelves to accommodate your items and create a visually appealing display. Consider the weight capacity of the shelves and how many items you intend to place on them. Look for shelves that are easy to install and come with all the necessary hardware. Explore different shelving styles, such as floating shelves, bracketed shelves, or shelves with built-in storage. Select shelves that blend well with your existing kitchen decor or that create a contrasting visual element.
Organizing Items
Effective organization is key to making open shelving both functional and visually appealing. Start by decluttering your kitchen items, keeping only the essentials and items you love. Arrange items by category, such as glassware, dishware, and cookbooks. Vary the heights and shapes of items to create visual interest. Use decorative containers, such as baskets or jars, to store smaller items and keep the shelves tidy. Avoid overcrowding the shelves; leave some empty space to create a balanced look. Stagger items and create groupings, rather than lining everything up in a row. Add decorative elements, such as plants or artwork, to enhance the shelves’ aesthetic appeal. Consider using a color scheme to tie items together and create a cohesive look. Rotate items seasonally or as needed to keep the display fresh and exciting. Regularly dust and clean the shelves to maintain their appearance.
Decorating with Plants

Adding plants to your open shelving can bring life and freshness to your kitchen. Choose plants that thrive in kitchen environments, such as herbs, succulents, or low-light plants. Place plants at varying heights to create visual interest and add dimension to the shelves. Use decorative pots and planters that complement your kitchen’s style. Consider the amount of sunlight your kitchen receives and choose plants that can thrive in those conditions. Group plants together for a fuller and more vibrant look. Water plants regularly and ensure they have adequate drainage. Incorporate different textures and colors of plants to create a diverse and visually appealing display. Plants not only enhance the aesthetics of your kitchen but also improve air quality. Rotate plants to ensure they receive adequate sunlight. Consider adding a watering schedule to maintain the health of your plants. Select plants that add a touch of nature and complement your decor.
Creating a Kitchen Herb Garden
A kitchen herb garden is a practical and aesthetically pleasing addition to any kitchen. Having fresh herbs readily available for cooking is a great convenience and adds flavor to your meals. Whether you have a spacious kitchen or a small apartment, you can create a thriving herb garden. It’s a project that brings nature indoors and allows you to enjoy the therapeutic benefits of gardening. A kitchen herb garden not only provides fresh herbs but also enhances your kitchen decor. Place the herb garden near a window or under grow lights to provide sufficient sunlight. The type of herbs you choose will depend on your culinary preferences and the growing conditions in your kitchen. Consider a variety of herbs to add different flavors and aromas to your cooking. Ensure that you have the necessary tools and materials to maintain your herb garden. Regular care will guarantee a continuous supply of fresh herbs.
Types of Herbs to Grow
Select herbs based on your culinary preferences and the ease of growing. Popular herbs to grow indoors include basil, mint, rosemary, thyme, and chives. Basil thrives in warm, sunny environments and is perfect for Italian dishes. Mint is versatile and can be used in both sweet and savory recipes. Rosemary is a hardy herb that adds a distinctive flavor to roasted dishes. Thyme is another low-maintenance herb that complements various cuisines. Chives are easy to grow and add a subtle onion flavor to your meals. Research the specific needs of each herb, including sunlight, water, and soil requirements. Consider the aroma of the herbs, as some herbs have stronger scents than others. Choose herbs that you enjoy using regularly to maximize the benefits of your herb garden. Mixing herbs can create an aromatic and flavorful cooking environment. Explore different herbs and their culinary uses to find the best options for your kitchen.
Placement and Maintenance

The placement and maintenance of your herb garden are critical for its success. Place your herb garden near a window that receives at least six hours of sunlight daily. If natural light is limited, consider using grow lights to supplement the sunlight. Use well-draining potting soil specifically formulated for herbs. Water your herbs regularly, but avoid overwatering. Check the soil moisture by inserting your finger into the soil. Trim your herbs regularly to encourage growth and prevent them from becoming leggy. Remove any dead or yellowing leaves. Fertilize your herbs occasionally with a balanced liquid fertilizer. Rotate your herb pots regularly to ensure even sunlight exposure. Protect your herbs from pests and diseases. Place your herb garden in a location where it’s easily accessible for harvesting. Monitor the growth and health of your herbs regularly. The right conditions will keep your herb garden thriving.
Upcycling Kitchen Items
Upcycling kitchen items is a creative and sustainable way to decorate your kitchen while reducing waste. Repurposing old items not only adds character to your kitchen but also gives your decor a unique, personalized touch. Transform everyday objects into functional and decorative pieces. Upcycling reduces your environmental footprint and encourages innovative ways to utilize what you already have. This creative project can involve anything from turning old jars into storage containers to repurposing old kitchen utensils into art pieces. Embrace your creativity and explore various upcycling ideas. Look for items that can be given a new purpose and aesthetic. This process will turn discarded materials into beautiful and functional elements for your kitchen decor. Upcycling transforms old objects into useful, stylish items. It also offers a unique aesthetic that store-bought items cannot match. Embrace this sustainable practice, turning discarded items into design elements.
Repurposing Old Jars and Bottles
Old jars and bottles are versatile items that can be easily repurposed for various kitchen decor projects. Clean the jars and bottles thoroughly before beginning your project. Use them as storage containers for dry goods like pasta, rice, and beans. Decorate the jars with paint, labels, or twine to match your kitchen decor. Use them as vases for flowers or herbs, adding a touch of nature to your kitchen. You can also use them as utensil holders, providing a stylish way to organize your cooking tools. Create customized spice racks by attaching the jars to a wooden board. Transform them into candle holders by adding candles or fairy lights. Old jars and bottles can be painted or decorated in various ways, such as using stencils, decoupage, or chalkboard paint. The possibilities for repurposing these items are endless. Add labels to your jars and bottles to identify their contents and enhance their aesthetic appeal. Upcycling jars and bottles creates both a unique and sustainable decor.
Crafting Customized Utensil Holders

Crafting customized utensil holders is a practical and creative DIY project. Start with old jars, cans, or even repurposed containers to create unique utensil holders. Decorate the containers to match your kitchen decor. Paint the containers with acrylic paint, chalkboard paint, or any color that fits your style. Use stencils, decals, or stickers to personalize your utensil holders. Wrap the containers with twine, fabric, or other decorative materials to add texture. Create a rustic look by using distressed paint techniques. Add labels to the utensil holders to categorize your utensils. Vary the size and shape of the utensil holders to create visual interest. Arrange the utensil holders on your countertop or in a drawer for easy access. Ensure that the utensil holders are sturdy enough to hold your utensils. Use a variety of embellishments, such as buttons, beads, or ribbons, to add extra detail. Customized utensil holders are a fantastic way to organize your cooking tools and add a touch of personality to your kitchen.
DIY Kitchen Lighting
Proper lighting is essential for a functional and aesthetically pleasing kitchen. DIY lighting projects can transform the look and feel of your kitchen without breaking the bank. Consider the layout and style of your kitchen and how different types of lighting can enhance it. Choose projects that match your skill level and are safe to install. DIY lighting allows you to customize your kitchen lighting to match your personal style. Ensure all electrical work is carried out safely and in compliance with local regulations. The right lighting can transform a dark and gloomy kitchen into a bright and inviting space. This DIY project can include installing pendant lights or adding under-cabinet lighting. Plan your projects carefully and gather all the necessary materials before you begin.
Installing Pendant Lights
Pendant lights are a stylish way to add focused lighting to your kitchen. They are ideal for illuminating kitchen islands, dining areas, or work surfaces. Installing pendant lights involves several steps, from selecting the right lights to the actual installation. Pendant lights can dramatically change the ambiance of your kitchen. When choosing pendant lights, consider the overall style of your kitchen and choose lights that complement the existing decor. Pendant lights come in various styles, from modern to vintage. You can choose a single pendant light or multiple lights to create a more dramatic effect. Ensure you measure the space where the pendant lights will be installed to choose the appropriate size. Installing pendant lights can involve wiring and electrical work, so make sure you are comfortable with this aspect or consult a professional. This DIY project adds both style and functional lighting to your kitchen.
Selecting Pendant Lights
Choosing the right pendant lights can significantly enhance your kitchen’s aesthetics. Consider the size and style of your kitchen when selecting the lights. Choose pendant lights that complement the design and style of your kitchen. Select the right size of pendant lights for your kitchen island or dining area. The size of your pendant lights should correspond to the size of the area. Consider the material and finish of the pendant lights. Ensure the lights are compatible with your kitchen’s electrical system. Look for pendant lights with adjustable heights to customize the lighting. Choose energy-efficient pendant lights to reduce energy consumption. Decide on the number of pendant lights needed to provide adequate lighting. Ensure the pendant lights you select are safe and meet all local regulations. Look for lights that are easy to install and come with all the necessary hardware. Consider the color temperature of the light bulbs.
Safety measures and Installation
Safety should be your top priority when installing pendant lights. Turn off the power to the circuit before you begin any electrical work. Always double-check that the power is off before touching any wires. Follow the manufacturer’s instructions carefully. Ensure that all electrical connections are secure and properly insulated. Use appropriate wiring connectors to connect the wires. If you are unsure about any step, consult a qualified electrician. Support the pendant lights adequately to prevent them from falling. Ensure the pendant lights are installed at a safe height above your work surfaces. Check local electrical codes and regulations. Ensure that the pendant lights are securely mounted to the ceiling. Wear safety glasses and gloves. If you are working at heights, use a stable ladder or platform. After installation, restore the power and test the lights to ensure they are working properly. Periodic checks maintain safety and function.
Adding Under-Cabinet Lighting
Under-cabinet lighting is a practical and stylish way to illuminate your kitchen countertops. It provides focused lighting for food preparation and other tasks. Under-cabinet lighting adds ambiance and can enhance the overall look of your kitchen. This DIY project can be installed easily, creating a warm and inviting kitchen environment. Consider the type of lighting you want to use, such as LED strip lights, puck lights, or rope lights. Under-cabinet lighting significantly improves visibility and makes your kitchen a more functional and enjoyable space. This project is easy to install and adds a touch of elegance. It’s perfect for both practical lighting and aesthetic enhancement. Choosing the right under-cabinet lighting is critical for a successful outcome.
Choosing Under-Cabinet Lights

When selecting under-cabinet lighting, consider various factors to ensure the right choice for your needs. LED strip lights are energy-efficient and easy to install, making them a popular choice. Puck lights provide focused lighting and are ideal for specific task areas. Rope lights offer a warm and ambient glow. Choose the correct color temperature. Warm white light provides a cozy feel, while cool white light provides a bright, modern look. Measure the length of your cabinets to determine the amount of lighting needed. Consider the brightness of the lights. You should choose lights that provide sufficient illumination without being too glaring. Choose lights that are easy to install. Look for options that come with adhesive backing or easy-to-use mounting hardware. Choose lights that are compatible with your kitchen’s existing electrical system. Consider adding dimmers to control the intensity of the lighting. Ensure the lights are safe and meet all local regulations. Select the right under-cabinet lights for your kitchen.
Wiring and Installation
The wiring and installation of under-cabinet lighting can vary depending on the type of lights you choose. Turn off the power to the circuit before beginning any electrical work. Carefully read and follow the manufacturer’s instructions. Most under-cabinet lighting options come with easy-to-follow instructions. For LED strip lights, simply peel off the adhesive backing and stick the lights to the underside of your cabinets. For puck lights, you may need to drill small holes and mount the lights using screws. Connect the lights to a power source, such as an outlet or a junction box. If you are unsure about any wiring steps, consult a qualified electrician. Ensure that all electrical connections are secure and properly insulated. Test the lights after installation to ensure they are working correctly. Always make sure to comply with local electrical codes. Use wire connectors and electrical tape to ensure all wiring is secure. Ensure that the lights are mounted securely. Wiring and installing under-cabinet lighting is an excellent DIY project for kitchen transformation.